How to Delete Multiple Emails on a Mac: Safe Steps
How to delete multiple emails on a Mac in Apple Mail, with safe checks before you erase Trash and lose mail you still need.

You open Apple Mail to find one receipt and end up scrolling past months of newsletters, delivery updates and old thread replies you never needed to keep. Deleting them one by one isn't realistic, but selecting hundreds and pressing Delete feels risky for good reason. The safe way to learn how to delete multiple emails on a Mac isn't a faster shortcut. It's a routine where you select deliberately, use Trash as a checking stage, and only erase permanently once you're sure nothing valuable slipped into the batch.
How to Select Several Emails in Apple Mail
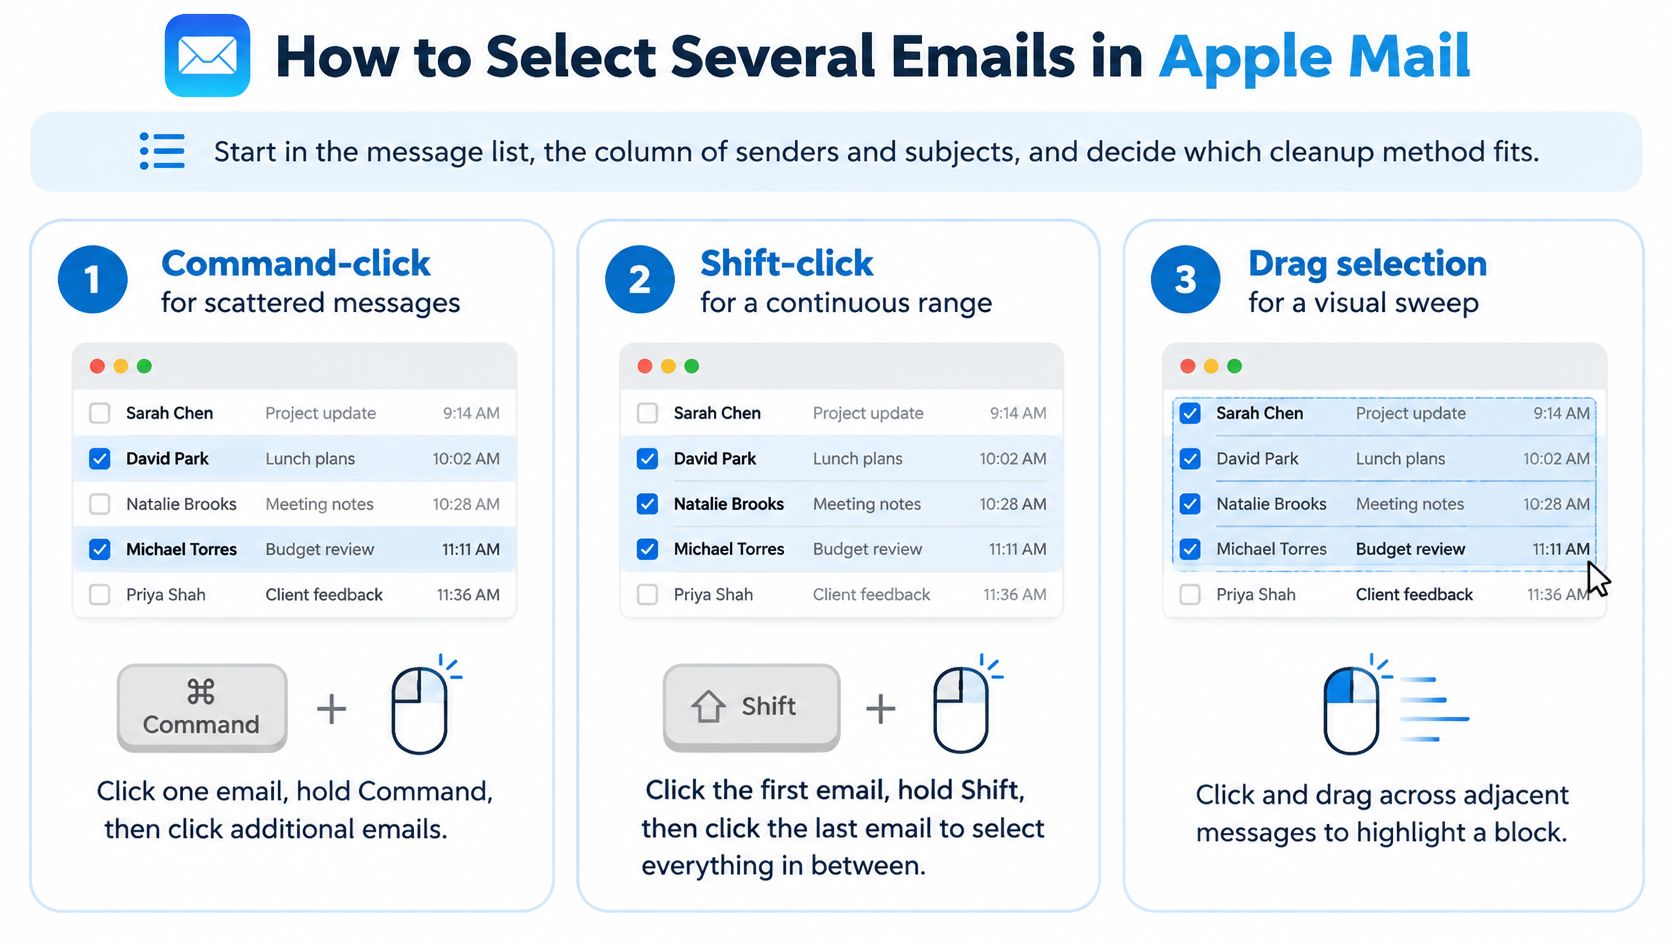
Start in the message list, the column showing senders, subjects and dates. Everything you do next depends on what shape your cleanup takes. A few scattered messages need a different selection method from a solid run of old mail, and both differ from removing years of messages from one sender.
The Two Click Patterns
- Command-click for scattered mail. Click one message, hold Command, then click each additional message you want. The selected emails don't need to sit next to each other, so this works when the mail you want gone is mixed in with mail you're keeping.
- Shift-click for a continuous block. Click the first message, hold Shift, then click the last message. Everything between them is selected too, which suits a list sorted by date where you want a whole stretch removed.
The Apple Mail User Guide documents both patterns, holding Command for non-adjacent messages and using Shift for a contiguous range, and notes the same workflow appears in documentation dating to the macOS 10.13 era published in 2017. That longevity matters because you're not learning a fragile new feature. You're using the stable, native way Mail has handled multi-message selection for years.
Search First for Large Cleanups
Clicking breaks down once the target set runs into hundreds. For those jobs, narrow the list with the search field before you select anything. Search by a sender's name to pull up everything from one person or one mailing list. Search by date range using a format like date:8/01/17-9/05/17 to isolate mail from a set window. Once the list shows only your target set, press Command-A to select every visible result at once.
Searching first changes the job from spotting individual messages to defining a set. You can repeat the same search next month and get a consistent result, which you can't say for scrolling and guessing.
| Method | How to Use It | Best For |
|---|---|---|
| Command-click | Hold Command and click each message | Scattered emails that do not sit together |
| Shift-click | Click the first message, hold Shift, click the last | A continuous block of messages in date order |
| Search, then select all | Run a sender or date-range search, then press Command-A | Old mail from one person or a set time window |
| Conversation selection | Select a message in a thread | Removing one complete conversation at once |
Watch the conversation row closely. Selecting a conversation selects every message in that thread, not just the header you clicked. If your highlighted count looks higher than the rows you expected, grouped threads are usually why.
Practical rule: Before you go further, the highlighted rows should match the count, sender or date range you meant to target. If they don't, fix the selection now while it's still just highlighting.
Once selected, you'd click the Delete button or press the Delete key. Hold off on that for a moment, though, until you know exactly where those messages go.
What Happens to Emails When You Delete Them
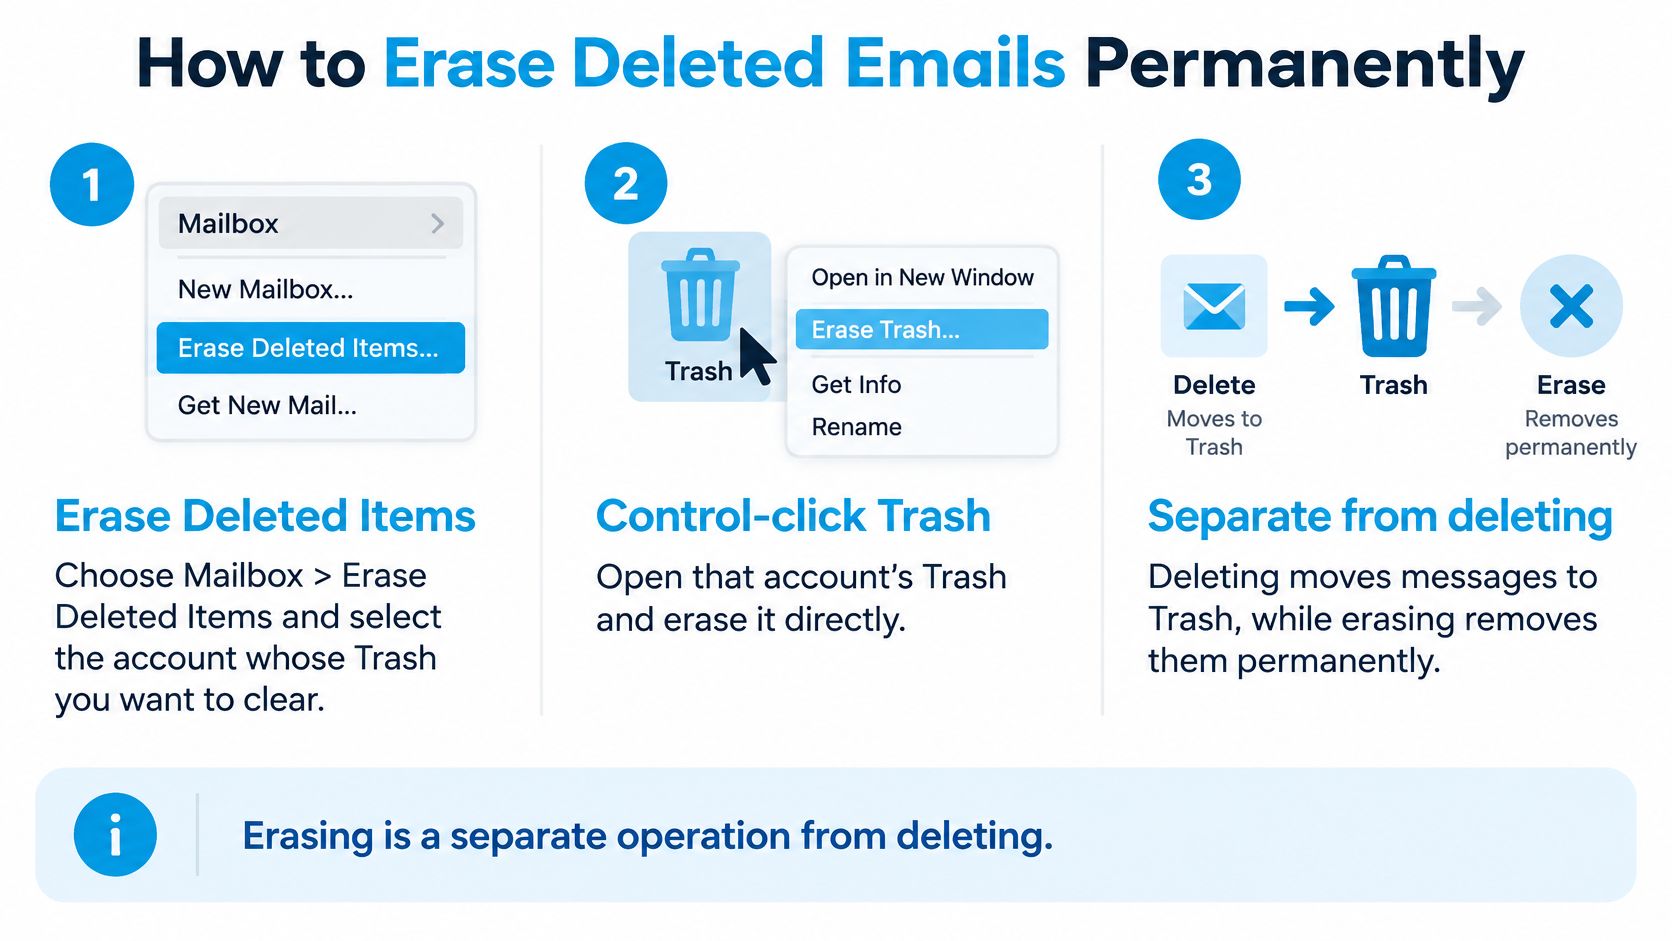
Pressing Delete doesn't destroy anything. It moves your selected messages to the Trash mailbox for that account, where they sit until a separate step removes them for good. That gap between deleting and erasing is your safety net, and I'd treat it as the most useful part of the whole process.
The current Mac Mail guidance from Apple states that deleted messages remain available until they are permanently erased, and that permanent clearing happens through Mailbox > Erase Deleted Items or by Control-clicking a Trash mailbox. Until you take that second step, a mistaken bulk delete is an inconvenience you can undo by moving messages back, not a loss.
| Action | What Happens | Permanent right away? |
|---|---|---|
| Delete selected messages | Moved to Trash | No, recoverable until erased |
| Delete a conversation | Every message in the thread moves to Trash | No, recoverable until erased |
| Delete a whole mailbox | All messages in that mailbox are deleted | Treat as high risk, confirm first |
| Remove from a Smart Mailbox view | Source messages stay in the underlying inbox | No, source remains |
| Erase Deleted Items | Messages leave the account's Trash | Yes, permanent |
Where the Risk Actually Sits
The first two rows are low risk because Trash holds the messages. A deleted conversation deserves a second look, though, since every message in the thread goes, including early replies you may not have read in months. Check what a thread contains before you rely on recovering it later.
The mailbox row is the dangerous one. Deleting a whole mailbox deletes all messages in that mailbox, so it operates at a completely different scale from deleting selected messages. Never use it as a tidy-up shortcut. If you only want mail out of sight while keeping it, that's a different action entirely, and it helps to understand how archiving an email differs from deleting it before you clean up in bulk.
Smart Mailboxes cause the opposite confusion. They gather messages from the underlying inbox into a view, so managing that view doesn't necessarily remove the source messages. You can tidy a Smart Mailbox and find the same mail still sitting in your inbox, because the view and the storage aren't the same thing.
Keep three milestones separate in your head. Select or search first. Move messages to Trash second. Erase separately, and only when permanent removal is what you intend.
Check Your Selection Before You Press Delete
A quick check takes under a minute and catches the mistakes that bulk selection makes easy. Run through it before you touch the Delete key, even when the search looked clean.
A Five-Point Check
- Compare the count. Does the highlighted total match roughly what you expected from the search? A big gap usually means conversations pulled in extra messages.
- Scan senders and dates. Read down the columns for anything outside your target, such as a colleague's reply sitting inside a thread you selected.
- Expand selected conversations. Open the thread and read the oldest message, since that's often where the first request, quote or agreement lives. Understanding how an email thread groups messages together explains why one click can take far more than one email.
- Confirm the account. Check the sidebar so you know which account you're in. Several accounts show near-identical folders, and a selection in the wrong one is hard to spot by eye.
- Test a small batch. Delete a handful first and confirm they land in that account's Trash as expected.
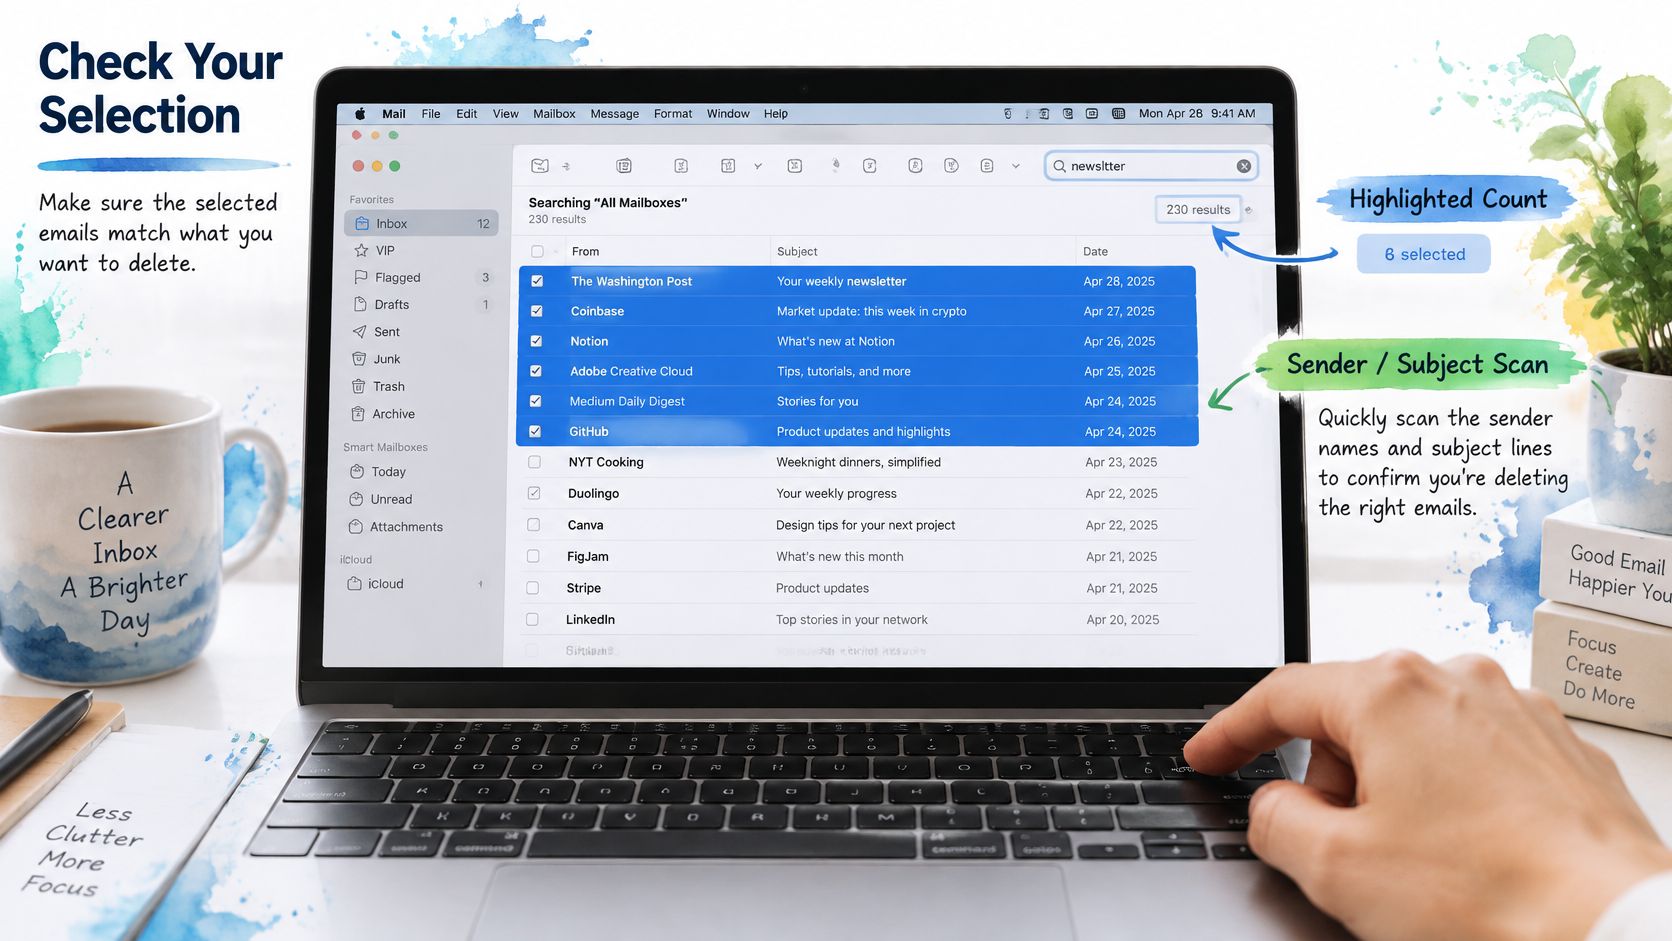
Say a freelancer searches for one client's name, selects a few hundred messages, and is about to delete the lot now the project has ended. Expanding one thread during the check reveals the signed scope of work attached to an early message. That single open thread is the difference between a clean mailbox and a lost contract.
Watch especially for receipts, contracts and password reset or account recovery messages. They hide inside otherwise disposable threads because people reply to whatever message is open. If a batch is too large to review on one screen, narrow the search instead of trusting it.
If you can't describe in one sentence what your selection contains, it isn't ready to delete.
How to Erase Deleted Emails Permanently
Erasing is the destructive step, and it's separate from deleting. Everything before this point was recoverable. Once you erase, the messages leave the account's Trash permanently, so take your time rather than rushing.
The Erase Steps
- Choose Mailbox > Erase Deleted Items and select the account whose Trash you want to clear.
- Or Control-click that account's Trash mailbox and choose Erase Deleted Items to clear it directly.
- For ongoing control, open Mail > Settings > Accounts > Mailbox Behaviors and set when deleted messages are erased automatically.
- Wait for synchronisation to finish, then open the same Trash in your provider's web interface and confirm it matches what Mail shows.
The Apple guidance on deleting emails and managing storage sets out both erase routes and the Mailbox Behaviors setting, and notes that an IMAP server may independently delete older Trash items regardless of local settings. It also publishes no benchmark or success-rate percentage for these operations. The guarantee is procedural, not statistical. Follow the steps and verify, rather than assuming.
Pitfalls and Their Fixes
- Erasing the wrong account's Trash. Read the account name in the erase dialog out loud before confirming. Similar folder names across accounts make this the easiest mistake to make.
- Confusing Archive with Delete. Archiving keeps the message and moves it out of the inbox. If storage is your problem, archiving hasn't solved it.
- Deleting a whole conversation by accident. Expand threads during your pre-delete check so you see every message you're taking.
- Assuming local deletion means instant server removal. Changes need time to sync. If you're unsure what's recoverable at each stage, it helps to know whether you can truly delete an email once it has synced before you erase.
That last point is why step four exists. Your Mac and your provider's server are two views of the same mailbox, and they don't always update at the same moment. Erasing while they're out of step can leave you unsure what went.
Before you erase: the Trash count in Mail and the Trash count in the web interface should agree. If they don't, wait for sync and check again.
Clean Up Newsletters Across Several Accounts
Newsletters rarely stay in one place. The same publisher often lands in your personal inbox, your work inbox and an old address you still keep in Mail. The built-in path handles this fine, it just needs repeating per account.
The Built-In Path First
Search by the sender's address, the publisher's name, or a phrase the issues share, such as the word unsubscribe. Select the results with Command-click or Shift-click, press Delete, and let them sit in Trash while you verify. Where the sender offers an unsubscribe link, use it, because deleting old issues does nothing to stop new ones arriving. The same stop-the-source logic applies beyond email, whether you're clearing lists here or following a guide to stop unwanted messages on Android for texts you never asked for.
With several accounts, one complication matters. Each account holds its own copy of a message, so the same search runs once per account and each account's Trash needs checking separately before you erase. There's no single Trash covering everything, and assuming otherwise leaves copies behind.
Judging a Dedicated Client
A dedicated Mac mail client can group mail across accounts by sender and mailing list, which saves you running identical searches repeatedly. That's a convenience, not a requirement, and I'd judge any such tool on neutral criteria rather than features lists.
- Provider support. Does it handle your providers and any company IMAP server you use?
- Trash behaviour. Does removing mail move it to Trash, or does it erase outright?
- Reversibility. Can you undo an action or restore a batch?
- Data handling. Where does your mail data sit, and who can see it?
On that last point, our own approach is plain. We receive no email content from the Mac app, and mailbox content isn't written to our server logs. The Mac app is also optional, since the agent connector can be used without it by signing in at sickle.app and adding mailboxes there. Whatever you use, those are the questions worth asking before you hand it several inboxes.
Run Your First Safe Bulk Delete
You now have every piece. Put them together once, on a small target, and you'll have a routine you can repeat without thinking hard about it.
The Routine in Five Steps
- Pick the target with a search for one sender, one date range or one shared phrase.
- Select the batch with Command-click or Shift-click, then check the highlighted count against what you expected.
- Press Delete so the batch moves to Trash. Never go straight to erase.
- Wait for synchronisation, then compare that account's Trash in Mail with the provider's web interface.
- Erase that account's Trash only once the two views agree.
The decision after your first run is simple. If all your mail sits in one Apple Mail account, the built-in search, delete and erase steps are enough, and you don't need anything else. If the same clutter keeps returning across several accounts, weigh a dedicated client against the criteria above. Our Email cleaner, opened with ⌘⇧K, lists mailing lists to unsubscribe from, old unread emails and mail grouped by sender, and one subscription covers the Mac app, every feature, every mailbox and the agent connector rather than selling the connector as a separate add-on.
Start smaller than you think you need to. One sender, one week of mail, one trip through Trash. A clean first run teaches you the rhythm, and the bigger cleanups afterwards stop feeling like a gamble.
If your clutter is spread across Gmail, iCloud, Outlook and other accounts, Sickle brings them into one native Mac app where the Email cleaner groups newsletters, old unread mail and messages by sender so you can clear them in batches through Trash. Visit Sickle to try it on your own mailboxes and run your first cross-account cleanup the safe way.